Betcha thought I was bailing out on this week's DD, again?! ;) Just runnin' a little late on the post...
I have to state right off the bat, I kind of cheated on this Design Dilemma. You see, I wasn't really asked to do a DD on this bathroom. My sister and I went on a pseudo-stealth mission to work a little MLHP magic for this much-deserving client.
I heard my Aunt Betty was planning a bathroom remodel, and yes, had to insert my nosy little self into her design plans! My sister teamed up by snagging these "before" pics with her iphone...
I'd call the overall look traditional-cottage.


 Before I show you my ideas for the update, you need to know a little bit about my Aunt. First, we share birthdays, so that makes her extra-special to me. Second, my Granny used to call my aunt, "Sparkles" because of her devotion to all things being or resembling diamonds - a true Leo all the way! Coincidentally, Aunt Betty is also trying to teach Avery to say, "Daddy, diamonds!" Yeah, Ben is just lovin' that! (One woman in the house loving diamonds is enough for Casa Giese...in his eyes!)
So, you can see how I can't imagine a design that didn't feature some sort of bling. I don't think a big-budget makeover is planned, but the fact that this is the restroom guests use makes me want to jazz it up a bit - make it a mini-showplace!
When I first saw the pic of this rosy and warm bathroom, I immediately thought of Aunt Betty's redo. The room is similarly arranged, in that it's a galley shape, ending in the bathtub, with a longish vanity area. I love the extra girlie touches: Molding around the mirror, Victorian gooseneck faucet, and crystal lamps. In fact, I love the idea of lamps on the vanity - it makes it more like a "dressing area" than a bathroom countertop, ya know?
 But then I spied this bathroom and all its iridescent glass tile mosaic. Look at all that shimma, Shimma!!
 I wonder if we could marry those two concepts: Warm, rosy (read: flattering) tones with a touch of that iridescence....Maybe something like these!
 I would keep my Aunt's shoulder-height wainscoting, but replace the wallpaper with this amazing blush series of glass tile. These are made by Hakatai, and are about 50% recycled glass - cool, huh? The tile isn't cheap, and apparently, is best left installed by someone well versed in glass tile know-how, but how unbelievably mesmerizing would it be? I think you would feel surrounded by pearls, and that would NOT be a bad thing for my aunt!The vanity counter is in good condition - no need to waste money replacing it, and the cabinetry might do just fine with a fresh coat of glossy, white paint. Hardware, however, is another place you can have fun - and get a good amount of bang for the buck. I'd switch out her hardware to these...
 There's only one window in the bathroom, and it's in the bath/shower enclosure To maximize the amount of light, thus getting the most effect of the pearlescent tile, I'd replace the fuschia shower curtain with this simple, white waffle weave one from Target. It comes in an extra-long length, to allow you to hang the rod near the ceiling. You've all heard me say it before - with curtains of all type - GO HIGH - it extends the eye, and makes the ceiling appear taller. You might be thinking that hanging the curtain high would be counterintuitive to my note about allowing in more natural light vis-a-vis the shower window....
 ...But not when we replace the standard light fixture in the toilet area with this divine mini -chandelier!
 The white curtain will provide a perfect "canvas" to which this fancy little sparkler will stand out - making a fun, "blingy" statement very befitting of Aunt "Sparkles!"
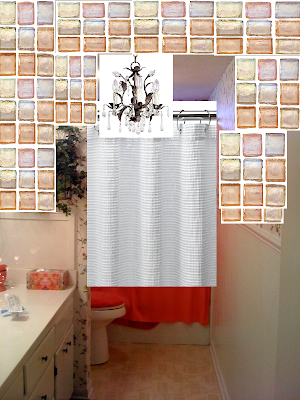 Will Work for Photoshop Skills!
Whatever... it took me forever to paste all those pics of the tiles, so please do me a favor: close your eyes, and visualize how truly lovely it would look (as opposed to this terribly rudimentary image!)
As I said, my Aunt didn't exactly contract with me, so any update or "after" pics I might get most likely won't be representative of this DD. I'm sure her new bath will be a fresh change; I can't wait to see it!


 Turns out that its pedigree isn't all that lofty - it's a Kohler model, the Brockway, offered by Home Depot. The arched, showerhead-looking faucet is the Cannock. The three-faucet model, plus faucets and accessories like the soapdish will set you back nearly 2Gs - bummer - but I'd argue the classic and whimsical style is worth the heavier price tag.




 Posts
Posts


